OCA_training_pathway
No longer supported for generating schemas.
A pathway for creating data schemas
Create data schemas at the Semantic Engine using our friendly user interface which walks through all the steps here
Schemas are a way to document your data and help make it more FAIR (Findable, Accessible, Interoperable, Reusable). Creating a schema is a process of continuous improvement. You don’t need to create the most perfect and complete schema at the beginning. Instead, follow this pathway to gradual improvement where each step produces something usable for researchers.
What are some benefits:
- Increase value and usability of data by adding context
- Enable early metadata creation when it is easier
- Easier to use standards with metadata
- Machine readable to reduce the number of times the same information must be manually inputted
- Easy to reuse existing metadata to generate new metadata
- Easier to deposit data into archive repositories
1. Introduction to the rationale
2. What is a schema
Learn what a schema is and how it can apply to your research.
Essentially, a schema describes the structure of your data and can contain helpful information such as what kind of data is in each column, what units you are using, a description of each data column and more. If you want to help people understand how to use your data you could provide them with a schema.
3. Write your first schema in Excel
Following these instructions you will download the schema template (an Excel file), and based on the dataset you are describing you will enter in minimal schema information in this first iteration.
What can you do with this schema?
- With this Excel document that you create you can store it beside (but separate from) your dataset for reference.
- You can share the Excel schema file when you share data to help others understand your data.
- If your lab or collaborators use similar data you can collaborate together to define and write a schema and save it in a shared folder.
- If you are a lab manager or leader you can request or require your students to use standard lab schemas in their research.
- You can use this Excel schema and convert it into a machine-readable format (OCA). Once you have a machine-readable schema, there are many more tools you can use and build to help you work with data.
This first Excel schema will meet a lot of user needs, but how can you be sure you are all using the same version? This is something that is addressed with the OCA schema standard and the use of SAID identifiers.
4. What is the Semantic Engine
Read our introduction to schemas and the Semantic Engine.
5. Create an OCA version of your Excel schema
Using the Excel schema that you created when you wrote your first schema, you can use the OCA parser to generate the OCA Schema Bundle.
The OCA Schema Bundle is a machine-actionable version of your schema and includes special SAID identifiers helpful for schema versioning and referencing. After you create the machine-actionable version of your schema you can also create a human-readable summary of the same schema in a plain-text format.
6. Create a Human-readable version of your schema
To create a human-readable version of your schema, go to Semantic Engine, upload your new machine-actionable schema, and select Generate Readme.
7. Learn about SAID identifiers
Read about Identifiers and SAID identifiers, how they relate to the OCA schema, and how they are unique digital fingerprints of your schemas.
8. Saving and sharing your schema
Read our advice and instructions on multiple ways to save, deposit, and/or publish your schema for archiving and/or public reference.
You can save your schema together with your data wherever you store your data, be it in a folder on your laptop, a shared drive, cloud storage or in a repository. Alternatively, you can put your schema separately in a repository, especially if it is suitable for others to use.
Be sure to save both the machine-actionable OCA schema bundle and a human-readable README text file together. You can always come back to the Semantic Engine to generate a new README text file if you have just the machine-actionable schema file.
9. Create a data entry sheet in Excel
After you have created a data schema, you can put it to use. Not only will it act as a reference for you and others when looking at the associated data, but you can also use it to generate a schema compliant Excel workbook for data entry.
For example, your lab may want everyone to record their -80 freezer samples using the same schema. The lab collaborates to write a schema that captures all the information they need for their samples. It includes things like a drop-down list of freezers in the lab, box labels, freezer positions, associated project names, sample collector etc. The schema is put on a common lab folder. Any new student to the lab can create a ‘data entry Excel’ from this schema which includes helpful descriptions from the schema, appropriate drop-down lists etc. All students in the lab can combine their data together to create a master sample list easily because by using the ‘data entry Excel’ they have all created schema conformant data that is easily merged.
After you have created your schema bundle, you can go to Semantic Engine, upload your new machine-actionable schema, and select Create a Data Entry Excel.
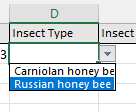
10. Add drop-down menu choices
A feature that you can add to your schema template is to add the ability to only allow data entries from a select list that you define (Entry Codes).
For example, you may want to limit gender choices to a few and you don’t want some entries to say ‘M’ and other entries ‘male’ and other entries ‘masculine’ etc. This would make your analysis more difficult, especially if you are creating a data schema for use by other researchers. The solution is to create custom dropdown lists in your schema Excel template.
An example of drop-down menus in use: when you create a ‘data entry’ sheet in Excel based on your schema, your drop-down menu items will be automatically created and therefore make data entry easier and less prone to errors.
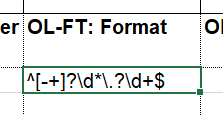
11. Add format and data validation
You can control the formatting of the data by modifying the format overlay.
In an Excel Template, you could choose to add format values to certain attributes. Format values restrict the formatting of the data, and any data entries that do not conform to the format will be filtered out during OCA data set validation.
Work is ongoing.